Controlling the NXT using Java and iCommand from MacOSX
Managed to get iCommand working on MacOSX Tiger 10.4.10 (running on an Intel iMac) after a few hours. I followed the instructions in the README.txt file in iCommand-0.6 folder. The brief, but accurate instructions on how to compile the sample programs using the Eclipse IDE also came in handy. Tony Buser’s instructions on pairing the NXT over a serial port as a slave is a useful reference as well. The iCommand README has instructions for Windows, Linux and MacOSX with several alternative options for each. I’m listing the options that worked for me (mostly a copy-and-paste from the README).
- Download iCommand (version 0.6 as of this writing) and Unzip the contents into a directory (Desktop is fine).
- Copy icommand.jar to the Java extensions directory /Library/Java/Extensions/.
- Download RXTX java binaries for source/Mac OS X and Unzip [rxtx-2.1-7r2.zip (Final) as of this writing].
- Copy files RXTXComm.jar and rxtxSerial.jnilib (inside the rxtx-2.1-7r2/MACOSX_IDE/ForPackageMaker/install/Library/Java/Extensions folder) to the Java extensions directory /Library/Java/Extensions/.
- Create the /var/lock directory with the command sudo mkdir /var/lock using he Terminal application (I didn’t find it necessary to create /var/spool/uucp directory and add yourself to the uucp group as indicated in the README).
- Make /var/lock world writable with the command sudo chmod 777 /var/lock from the Terminal.
- Pair your NXT and your computer using the Bluetooth setup assistant following Tony Buser’s instructions.
- Edit the icommand.properties file ( inside icommand-0.6/dist folder), uncomment the line specifying the serial port and set it to the serial port name from step 7. You can edit the file using TextEdit and the port specification would normally be nxtcomm=/dev/tty.NXT-DevB-1 . If you have changed the name of your NXT the port would be something like /dev/tty.YOURBOTNAME-DevB-1 .
- Copy the icommand.properties file into your home directory (/Users/YourUserName directory).
- Download and Install Eclipse Classic for Mac OS X (Europa build 3.3.1 as of this writing).
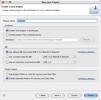
- Start Eclipse and create a new Java project (File > New > Java Project and give it a name – I called mine robotest). Click on the Finish button when done (see screenshot).
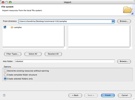
- Import the icommand sample programs into your project. Expand on your project folder in the Package Explorer and select the src folder. Now choose Import… from the File menu (see screenshot). Expand the General folder and select Filesystem for the Import Source in the resulting dialog box (see screenshot) and click on the Next button. Then select the samples folder inside icommand-0.6 folder in the resulting dialog box by clicking on the Browse… button. Make sure the checkbox next to the samples folder is checked and click on the Finish button (see screenshot) .
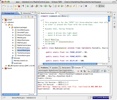
- Open the RadioControl.java file that is inside the default package in your Eclipse project (see screenshot).
- Make a simple 2-wheeled robot (or hook motors to port A and B).
- Make sure the NXT is on and Bluetooth is turned on in the NXT.
- Compile and run the RadioControl.java program (Shift-Command-F11). The RadioControl application window will open a window (this is a blank window with no UI). The computer will connect to the NXT (bluetooth indicator on NXT will turn into a diamond). Use the arrow keys to move forward, back and turn.
If you get an gnu.io.PortInUseException error it usually means that your application terminated prematurely and the lock file didn’t get cleared. You have to manually delete it before it will work again from Terminal. Go to the /var/lock folder and delete the lock file using sudo rm lockFilename . The lockFilename is something like LK.003.009.014 .
If you have problems connecting to the NXT; delete the NXT device in Bluetooth preferences and pair it again as described in step 7. I find that the computer connects to theNXTalmost instantaneously and command response is near instantaneous as well. This is a very viable way of remotely controlling an NXT.


