Archive for Programming

Starting to Design the Interface

Having learned how to use the motor commands provided in Fokke’s tutorial, it is time to start learning different aspects of C# and create an interface for running the robot.  To begin, I have placed four buttons on the interface that I plan to use to move the robot forward, backwards, left, and right.  In addition, I have included a brake button to stop the robot.  Working with the forwards and back commands, I have realized that the robot tends to move in a curved direction even though both motors are running at the same speed.  To overcome this issue, I have slowed the motor speed to about 50%.  Although not totally perfect, this seems to have greatly mitigated the problem.  My first attempt at turning the robot called for using the turn command and setting the motor speed to 50%.  In doing so, the user would have to hit a brake button to stop the robot after it turned the desired amount.  However, when trying this method out, I found it extremely difficult to precisely control the amount the robot turned.  Currently, I am trying to develop a way for the user to control the amount of degrees the robot must turn.  In order to accomplish this I will need to learn more about how to write a C# program.
Comments

Running Motors Simultaneously

Now that I am able to establish a Bluetooth connection with the NXT brick and I am able to get the robot to turn when I hit a button on the form, it is time to explore how to get the robot to move forward (i.e. have two motors run simultaneous while clicking only one button).  At first, I tried to use the “coast command” that Fokke included in his tutorial.  However, I was unable to get the robot to respond to this command.  Instead, I used the turn command and set the amount of degrees for the motor to turn to zero.  In the click event procedure for the forward button in my form, I included the turn command (degrees set to zero) for the two motors connected to ports B and C on the NXT.  When I ran the application and clicked the button, the robot moved forward.  I realized, however, that I had no way of stopping the robot.  I actually had to turn off the NXT brick to get it to stop.  I decided to use the “brake command” to stop the robot.  To do this, I added a new button to the form named “stop” and included the brake command for both motors in the button’s click event procedure.  Finally, following the same process I used to get the robot to move forward, I made a new button named “back” that moved the robot backwards. 

Comments

Triumphs and Tribulations

Here are some of the issues I ran into when following Bran Fokke’s tutorial and how I overcame them.

Problem 1: The “click event procedure”

As it turns out, I had not correctly written the click event procedure for the button I added to my form. Initially, I had nested two click event procedures within each other. Additionally, I had named my button something different than what Fokke had named his in his tutorial. As such, I started debugging my program. After some time, I was able to figure out how to add a click event procedure to a button in a form using C#. Again I ran the program. This time there was no errors when I executed it. Everything seemed to be perfect. Then I tried to click the button, expecting the robot to turn, on my form and nothing happened. This was a little frustrating for me because I did not know where to go to next.

Problem 2: The “AutoPoll property”

I started trying to find the error in my program by rereading Fokke’s tutorial. However, it appeared I had followed it correctly. In attempt to fix my problem, I decided to make sure each motor was assigned to the right port on the NXT brick and that I had chosen the correct COM port. Everything was set up right. I then looked at the program Fokke provided in the QuickStart.zip, which can be found in the download section on Fokke’s website, for inspiration. What I found out is that in his NXTBrick component he had set the AutoPoll property to true. So I went back to my program and set it to true also. To my excitement, I was able to click on the button in my form and the robot turned clockwise. Wow! Awesome! Great! Spectacular!

Comments

Working with C#

Knowing I was able to connect to the NXT brick using Bluetooth, I moved to the next tutorial provided on Bram Fokke’s website.

Working with the C# commands was quite an interesting experience for me, since this was the first time I have used C#. Although I never have used C#, I do have some experience with Visual Basic. Using this knowledge, I was able to get the basic idea of what Fokke was saying in his tutorial. Adhering closely to Fokke’s instructions, I began adding the motor commands to my program. Seemingly when everything seemed perfect, I ran my program. To my dismay, I got numerous errors when I tried to execute the program. I had hoped one of the motors on my robotic car would have moved forward (thus turning the robot), but it did not.

Comments

Connecting to the NXT using the NXT# .NET library components in Visual Studio 2005

This is an ongoing series of screencasts on how to use Bram Fokke’s NXT# components to control the NXT over Bluetooth. This will be just a test to see if the computer can connect to the NXT over Bluetooth. I’m following the instructions provided on Bram’s site to create a simple C# application that connects to the NXT. Each step outlined below has a corresponding screencast, and I will keep adding to it. Note that I’m a complete novice to C# and have just ordered Learning C# by Jesse Liberty and Brian MacDonald. So, if I’m taking the long route on any of these steps, please post a comment and I’ll fix it.

  1. Pairing the NXT as a slave via Bluetooth in Windows XP.
  2. Installing NXT# components into Visual Studio 2005.
  3. Creating a new application that connects to the NXT.

Comments

Controlling the NXT using Java and iCommand from MacOSX

Managed to get iCommand working on MacOSX Tiger 10.4.10 (running on an Intel iMac) after a few hours. I followed the instructions in the README.txt file in iCommand-0.6 folder. The brief, but accurate instructions on how to compile the sample programs using the Eclipse IDE also came in handy. Tony Buser’s instructions on pairing the NXT over a serial port as a slave is a useful reference as well. The iCommand README has instructions for Windows, Linux and MacOSX with several alternative options for each. I’m listing the options that worked for me (mostly a copy-and-paste from the README).

  1. Download iCommand (version 0.6 as of this writing) and Unzip the contents into a directory (Desktop is fine).
  2. Copy icommand.jar to the Java extensions directory /Library/Java/Extensions/.
  3. Download RXTX java binaries for source/Mac OS X and Unzip [rxtx-2.1-7r2.zip (Final) as of this writing].
  4. Copy files RXTXComm.jar and rxtxSerial.jnilib (inside the rxtx-2.1-7r2/MACOSX_IDE/ForPackageMaker/install/Library/Java/Extensions folder) to the Java extensions directory /Library/Java/Extensions/.
  5. Create the /var/lock directory with the command sudo mkdir /var/lock using he Terminal application (I didn’t find it necessary to create /var/spool/uucp directory and add yourself to the uucp group as indicated in the README).
  6. Make /var/lock world writable with the command sudo chmod 777 /var/lock from the Terminal.
  7. Pair your NXT and your computer using the Bluetooth setup assistant following Tony Buser’s instructions.
  8. Edit the icommand.properties file ( inside icommand-0.6/dist folder), uncomment the line specifying the serial port and set it to the serial port name from step 7. You can edit the file using TextEdit and the port specification would normally be nxtcomm=/dev/tty.NXT-DevB-1 . If you have changed the name of your NXT the port would be something like /dev/tty.YOURBOTNAME-DevB-1 .
  9. Copy the icommand.properties file into your home directory (/Users/YourUserName directory).
  10. Download and Install Eclipse Classic for Mac OS X (Europa build 3.3.1 as of this writing).
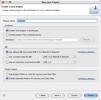
  11. Start Eclipse and create a new Java project (File > New > Java Project and give it a name – I called mine robotest). Click on the Finish button when done (see screenshot).
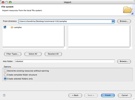
  12. Import the icommand sample programs into your project. Expand on your project folder in the Package Explorer and select the src folder. Now choose Import… from the File menu (see screenshot). Expand the General folder and select Filesystem for the Import Source in the resulting dialog box (see screenshot) and click on the Next button. Then select the samples folder inside icommand-0.6 folder in the resulting dialog box by clicking on the Browse… button. Make sure the checkbox next to the samples folder is checked and click on the Finish button (see screenshot) .
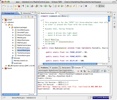
  13. Open the RadioControl.java file that is inside the default package in your Eclipse project (see screenshot).
  14. Make a simple 2-wheeled robot (or hook motors to port A and B).
  15. Make sure the NXT is on and Bluetooth is turned on in the NXT.
  16. Compile and run the RadioControl.java program (Shift-Command-F11). The RadioControl application window will open a window (this is a blank window with no UI). The computer will connect to the NXT (bluetooth indicator on NXT will turn into a diamond). Use the arrow keys to move forward, back and turn.

If you get an gnu.io.PortInUseException error it usually means that your application terminated prematurely and the lock file didn’t get cleared. You have to manually delete it before it will work again from Terminal. Go to the /var/lock folder and delete the lock file using sudo rm lockFilename . The lockFilename is something like LK.003.009.014 .

If you have problems connecting to the NXT; delete the NXT device in Bluetooth preferences and pair it again as described in step 7. I find that the computer connects to theNXTalmost instantaneously and command response is near instantaneous as well. This is a very viable way of remotely controlling an NXT.

screenshot_04 Importing the sample source files into your project screenshot_05 screenshot_06 screenshot_09

Comments (4)

NXT Programming Software and NXT Off-Brick controllers

Steve Hassenplug’s NXT site has a feature comparison table of NXT programming environments and off-blick controller software.

Comments

Remote control of NXT using iCommand and ruby-nxt

Nice article in MacTech magazine by Rich Warren on how to control an NXT over bluetooth using iCommand and ruby-nxt.

Comments

NXT# and NXT.pm

Wow! two modules to control an NXT robot via bluetooth using C# and Perl. We are on the bleeding edge (drip), but things look very promising.

We may be able to use the stock mindstorms firmware and use one of these modules to control it via bluetooth. Less painful than swapping out NXT firmware with leJOS NXJ or NXC. Besides C# and Perl are easier to interface with web servers.

Comments

Bluetooth drivers for communicating with the NXT

I just finished reading an interesting article on Communicating with LEGO NXT via Bluetooth in C# written by Pierre Poliakoff. There was a very useful hint in there that may explain our difficulties with communicating with the NXT via bluetooth from Windows. Pierre states…

I confirm what many other people have reported: Bluetooth communication with Lego NXT is very sensitive to the Bluetooth drivers used. Most of the time, it is strongly recommended to NOT install — or if they are already installed, to uninstall — the drivers provided by the Bluetooth adapter manufacturer and to use the Microsoft Bluetooth default drivers instead. 

This article will help immensely if we have to resort to low level (byte-by-byte) bluetooth communication with the NXT. I’m hoping that we can find a library or high-level framework for bluetooth communication. 

Comments